Forum
Source Film maker, must read !
Created 3rd January 2010 @ 00:31
Add A Reply Pages: 1 2 ... 8 Next »

Okay so i have been reading up for a day or so and i thought i would need to post this. Basically in past 2 days people found a way to use a deleted too called Source Film maker, the same tool used to make meet the team videos, that came with First tf2 public beta (2 years ago) i am not yet sure if it is okay to post links or anything as it COULD potentially be considered warez, but it is no different than the method to keep demos from getting broken. Anyway here are few videos of it in action and i will keep you guys up to date with any needed download links and such for this to work.
Here are few sample videos of it in action. Not all very good as they are only tests. And the DODs video is made by valve apparently only shows what its capable of.
http://www.youtube.com/watch?v=uPWuy75drdc
http://www.youtube.com/watch?v=HCeX0m3d49w
http://www.youtube.com/watch?v=xjA0M7raoqc
http://www.youtube.com/watch?v=XasGXOF2zo0 (REALLY BUGGY)
http://www.youtube.com/watch?v=tYR1Hyti5G0
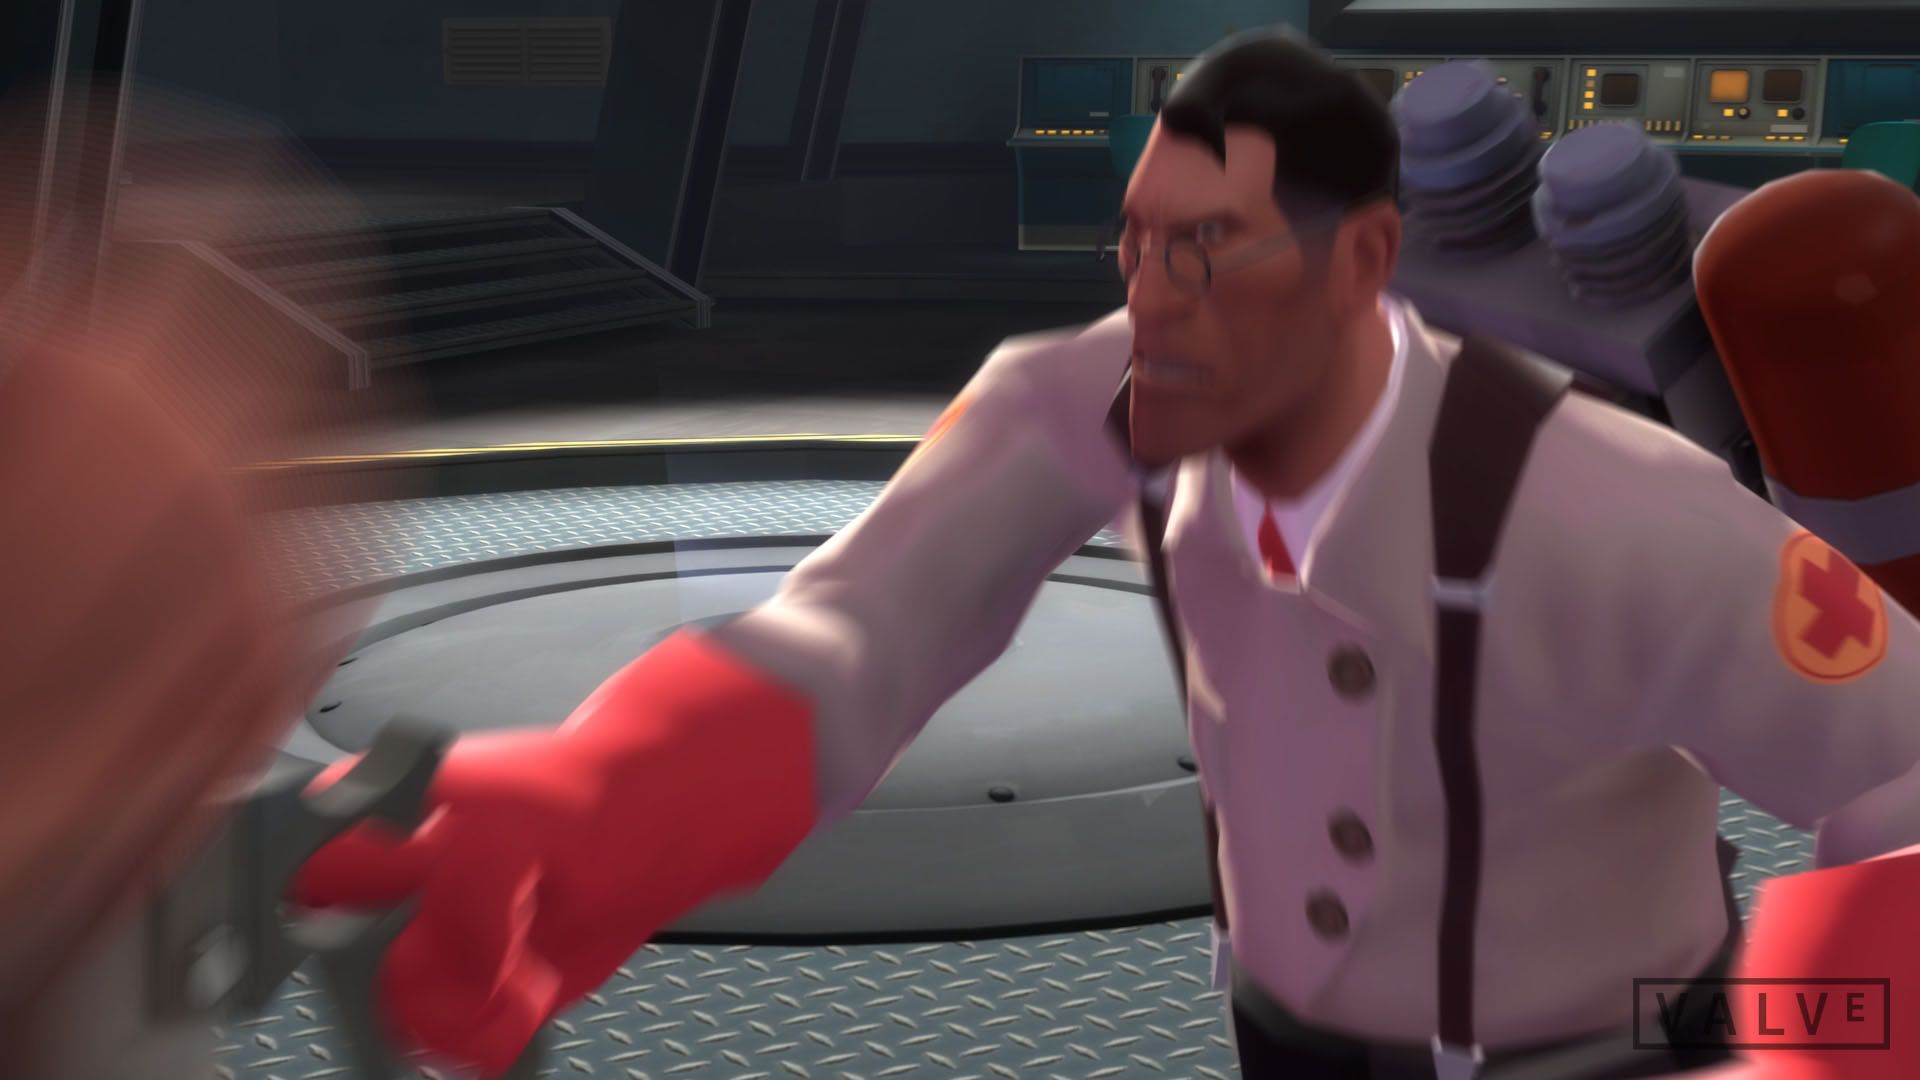
This also has a VERY cool feature called poster export, you can export images of any resolution, here are few examples.
http://img193.imageshack.us/img193/483/poster3lv.jpg
http://img34.imageshack.us/img34/8637/poster5p.jpg
http://img138.imageshack.us/img138/8021/poster6f.jpg
http://img141.imageshack.us/img141/7282/poster4i.jpg
http://i96.photobucket.com/albums/l166/noodleboy347/medic-03.jpg
http://filebox.me/files/uy04s5sv5_meetmedic.png
You could definietely say they were screencaps from new meet the team videos cause of the quality.
Here is a guide to get it working.
AND A VIDEO HERE
http://www.youtube.com/watch?v=KaHN1tHk1dI
Step 1: Download Team Fortress 2 Beta.
http://thepiratebay.org/torrent/3819765/Team_Fortress_2_beta_NoSteamStep 2: Install it. DO NOT INSTALL IN STEAM FOLDER just in case they would be able to track it. (Yes i know install is weird, a naked guy with his dick censored skulls and some weird music playing but it works i used it.)
Step 3: Open FINAL_FIXX.rar and put these files in the installation folder of your beta TF2. Replace everything.
Step 4: Download the bin files.
http://www.flamehaus.com/snakez/enginetools.zipStep 5: Open the .zip file and put everything in the bin folder of your beta TF2.
Step 6: Make a shortcut of hl2.exe
Step 7: Right click, go to properties and in the end of target field put this in
“-game tf -applaunch 440 -window -noborder -novid -tools” without the quotes.Step 8: Launch the shortcut and it should now work.
Now a little guide how to use it.
1. To use: Ctrl + L to load a map
2. Press the record button to record some actions.
3. Do Step 2 as many times as you’d like.
4. Click the Active Camera/ Work Camera button to take control of the camera.
5. Place camera.
6. Trim timeline down to properly record the shots.
7. Crank the motion blur and/or depth of field.
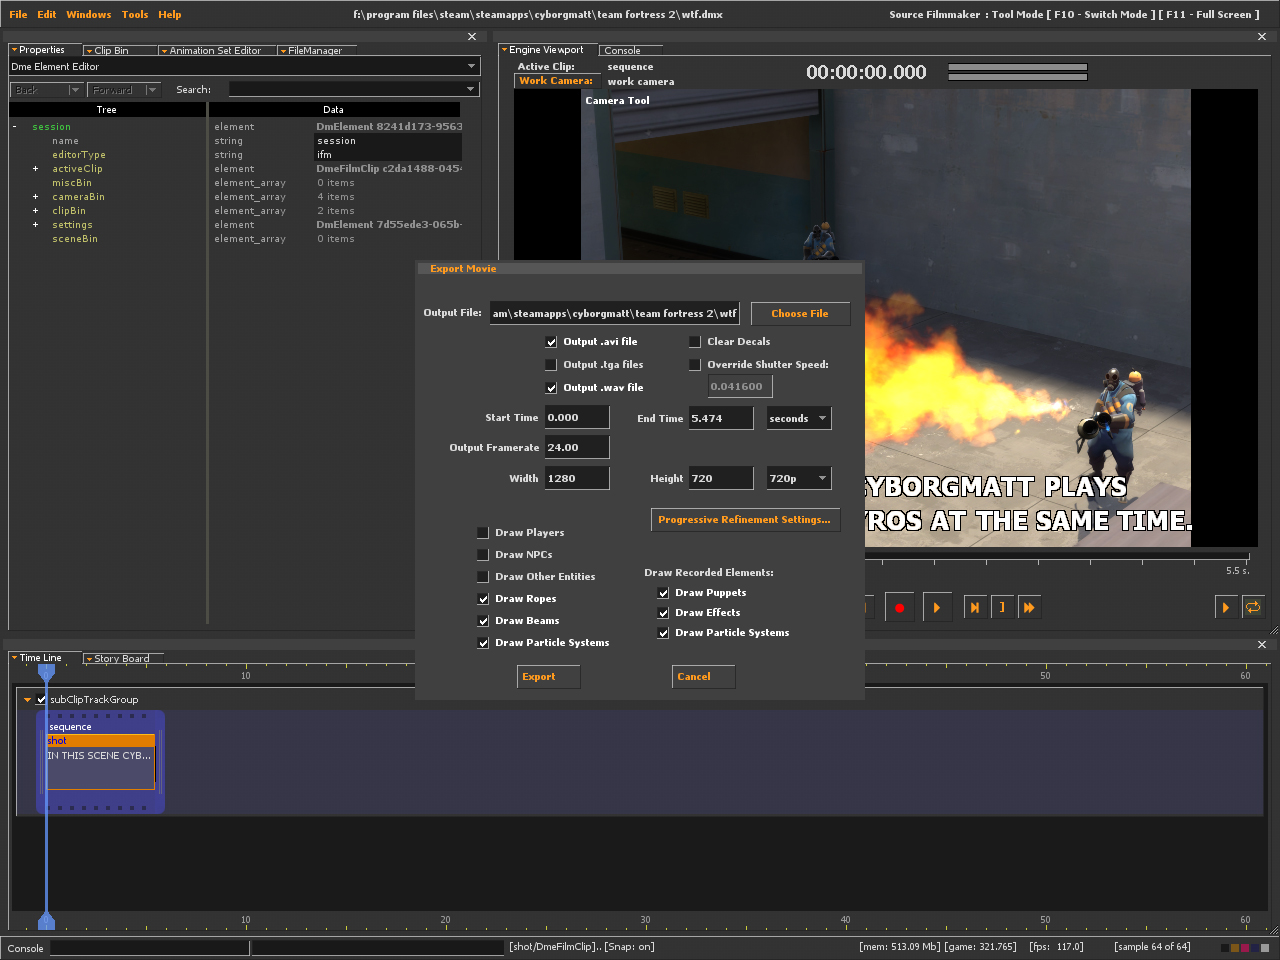
8. File > Export > Movie > change the renders settings to your liking.
9. Find something to do for a while because rendering takes forever.
And here is a video tutorial for lazy people.
http://www.youtube.com/watch?v=gsw-J_vS-Dg
Use these commands in console to stop the round timer which gets very annoying.
mp_waitingforplayers_cancel 1
ent_fire team_round_timer pause
Here is a moving camera tutorial. SUPER USEFUL thanks to pandamobile.
Here are few videos of it in use, VERY COOL.
http://www.youtube.com/watch?v=O9XvVNwTlTQ
http://www.youtube.com/watch?v=X8Juj21Gylc
Step 1. Record any action the way you normally would.
Step 2. Rightclick on your shot in the sequence timeline and press ‘Set new camera’
Step 3. Click on the camera selector (Work Camera/Active camera button) above the viewport.
Step 4. Now we record the path for your camera by moving as you would normally record action. (Sometimes it’s recommended that you tick the “Noclip” option before you start the recording).
Step 5. Move about.
Step 6. Press Esc when you’re done your camera-ing.
Step 7. Rightclick on the Shot in the timeline. Hit “New Animation Set”, and select the camera you used for the recording.
Step 8. Open the Animation Set Editor, and press the red circle.
Step 9. Now you’ll see a shit-ton of lines everywhere on your timeline, and a bar around your time-mover-thingy.
Step 10. Drag the right side of bar out (this part is still somewhat confusing to me, I’ll have to play around with it some more to figure it out 100%) to the end of your shot.
Step 11. You can add effects like smoothing, jittering, etc. by grabing the sliders:
http://img12.imageshack.us/img12/6686/tutorial1v.pngStep 12. Play around with it for a while, do a lot of test shots before trying anything in a film.
Step 13. Press the Green Arrow to quit the edit-thing mode.
Step 14. Right click on your shot > Zoom in
Step 15. Make sure you’re all the way at the beginning of your clip’s timeline.
Step 16. Un-tick “Take 1” (or which ever take your camera happened to be) and this will stop your arms from floating around with the camera. (If someone knows how to hide the view model, please tell me)
Step 17. Right click on the clip, and Zoom out.
Now you should have a fairly decent shot to use for your movies. Just be mindful, when you Un-tick the Camera’s take, your arms will still be there, at the exact moment in the time line where you un-ticked it. So just make sure your final shots won’t be looking the same direction as where you started the clip. (You can see your floating arms through walls too)
Here is a very good animation tutorial, walks you through steps you need to know to animate your models face, bones and so on check it out.
http://www.youtube.com/watch?v=UDk_Gnmrtv8
I didn’t do any of the work here, i’m just compiling all useful information together for ease of access.
credits to brilliant guys on facepunch forums and of course the evil guys on warez sites.
Last edited by Buck,


holy shit

O WOW that is fcking amazing

Epic. Win.
I cba to go getting the original TF2 files/beta/whatever, but now we know how powerful valve’s in house tools are, I WANT that official release :P
i never realised this was in the early beta, i heard valve were gonna release it some day but yea

Apparently this was going to be released after meet the team videos are done. Still what amazes me so much is that they probably used this build to make the trailers and possibly meet the heavy. Now imagine how more powerful it is for newest videos like meet the spy or meet the sniper, they are even more amazing in fluidity of animation and quality. Hopefully someone finds a way to get this working with new content and no beta client.

if this was used to make the meet videos, how do you do the custom animation?
or do you make them in a 3d software

Any idea if this tool is compatible in all source games / orange box engine games?
or just tf2?
the DODS video would suggest that it is also compatible in other source games? Was the video made before or after DODs was moved to the orange box engine?
anything before tf2 beta works episode 1, cs, hl2. i haven’t test it extensively though.
Someone on facepunch said this so it should work with any game pretty much.
also i still haven’t got the beta myself to test it, i would try and look for custom animation stuff if its even possible to do it, (in worst case scenario you could make custom animations same way as skins have them and replace lets say taunt animations with that and use it with the film maker. So i assume it would be possible.
Last edited by Buck,
http://developer.valvesoftware.com/w/images/9/99/Filmmaker_pyros.jpg
a picture of what it looks like
*snip*
Last edited by Buck,
Add A Reply Pages: 1 2 ... 8 Next »


 content rss